A quick explainer on why we built we job management directly into Magpie, our data engineering platform. Plus, a step-by-step tutorial on how to use it.
SETTING THE STAGE
When first setting up a data lake, it is common for organizations to start with a static export of data. This enables users to immediately take advantage of the advanced analytics capabilities of the data lake without having to develop the sometimes-complex logic of periodically updating the data. While performing this initial analysis, users can pull in ad hoc data sources as needed to enrich their existing data and begin to crystalize a list of data sources and tables that will be useful moving forward.
Inevitably, though, the data in the lake will need to be updated in a repeatable manner, derived tables will need to be rebuilt, and the entire refresh process will need to be monitored. Building out and operationalizing these Extract, Transform, and Load (ETL) processes in the data lake can be a stumbling block for organizations, since it requires a significantly more complicated infrastructure than the prototype analysis did.
Using Magpie’s job management infrastructure, organizations can short-circuit this process and operationalize their data lake quickly and easily. As an example, we’ll now walk through creating, scheduling, and monitoring a job to load building permit data from DC’s Open Data portal into a Magpie data lake.
CREATING A JOB
Like all Magpie functionality, we can get started with job management through the Magpie notebook using Magpie script commands. In Magpie, related tables are grouped together in schemas and related jobs are grouped together into projects. This helps both with data lake organization as well as permissions management. To start, let’s create a schema and a project for our DC Open Data:
create schema {
  "name": "dc_open_data",
  "description": "Data loaded from opendata.dc.gov"
};
create project {
  "name": "dc_open_data",
  "description": "Jobs that load data from opendata.dc.gov"
};
Like setting a search path in PostgreSQL, in Magpie, you can “use” a schema or a project so that you can refer to tables and jobs without qualifying them by their parent schema or project. We’ll do that next to set our context:
use schema dc_open_data;
use project dc_open_data;
Now that we have our project and schema created and set, we can create a job to load the building permits. Jobs are composed of a set of tasks that are executed in sequence. Magpie supports five types of tasks: Magpie scripts, SQL queries, Python scripts, Scala scripts, or nested references to other Magpie jobs. These different types of tasks can be mixed and matched to create a full data processing pipeline. To create a job, we just specify the name and an optional description:
create job {
  "name": "update_building_permits",
  "description": "Update the building permit data"
}
Since DC Open Data provides their tables as CSV files, loading the data in is as simple as using Magpie’s save URL as table command. We can add a Magpie script task to our job that will execute that command and load in the data:
alter job update_building_permits add magpie script task {
  "name": "load_data",
  "description": "Load the building permit data from opendata.dc.gov"
} with script """
// drop the existing table
drop table if exists building_permits with delete;
// load the updated table from the opendata website
save url "https://opendata.arcgis.com/datasets as table building_permits
    /52e671890cb445eba9023313b1a85804_8.csv"
  with header with infer schema with multiline;
"""
SCHEDULING AND EXECUTION
Now that we have our simple job configured, we can execute it directly in the Magpie notebook to load the data:
exec job update_building_permits
Having this job available to execute on demand is helpful, but in order to operationalize it, we want to schedule it for periodic execution. In Magpie, we can schedule it to run nightly using a simple cron-style syntax. We’ll also specify that the job should run in the dc_open_data schema:
create schedule {
  "name": "daily",
  "expression": "0 0 11 * * ?",
  "context": {
    "schemaName": "dc_open_data"
  }
} for job update_building_permits
MONITORING
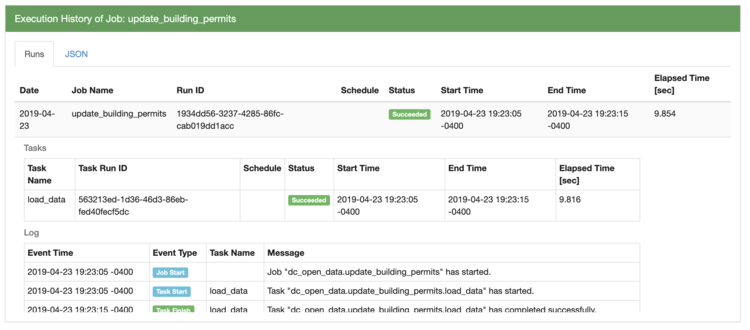
Now that the job is scheduled, we have two options for monitoring it. We can query the history directly within Magpie or we can set up an email notification that triggers when the schedule completes. To query the history, we can use the execution history command:
execution history of job update_building_permits

Setting up an email notification is as easy as specifying the appropriate notification trigger (either job failure or job completion) and the notification channel (email). Emails can either be sent to the Magpie user’s email or a custom email. Here, we’ll create notification that is sent to the Magpie user’s email when the job fails:
create notification subscription {
  "trigger": "JobFailed",
  "channel": {
    "channelType": "UserEmail"
  }
} for schedule update_building_permits.daily;
WRAPPING UP
With just a few simple commands, we’ve created a job that refreshes our building permits table, scheduled it to run every night, and set up a notification in case it fails. While this was a simple example, more complicated flows can easily be created and monitored in the same way using Magpie’s SQL, Python, Scala, and nested job support.
To learn more about creating and operationalizing a data lake with Magpie, click here.
Jon Lounsbury is the Vice President of Engineering at Silectis.
You can find him on Github.
